
You photograph the best part of a wedding speech, then discover a blurry face against a bright window. Or you take twenty party pictures and miss every good expression. If you're wondering how to take event photos with an iPhone, you don't need a complicated camera setup. Better timing, light and a few simple camera controls can noticeably improve your results, even on an older model.
Why Event Photos Go Wrong on an iPhone
Event photography is difficult because you rarely control what happens next. People move, the lighting changes and the moment you want may last less than a second.
In a dark room, the camera may use a longer exposure to collect more light. That helps brighten the image, but a dancing guest can move during the shot and appear blurred. Bright windows or stage spotlights create the opposite problem: the camera has to balance a dark background against a much brighter subject, sometimes losing detail in one of them.
Large videos and high-resolution files can also fill your storage mid-event. Understand these three problems, and the following iPhone event photography tips become easier to apply.
Get Your iPhone Ready Before the Event
Make these checks before you leave, rather than while people wait for a group picture.
Clean the lenses. Fingerprints soften detail and create streaks around lights.
Enable Grid and Level in Settings, Camera. They help straighten and balance shots.
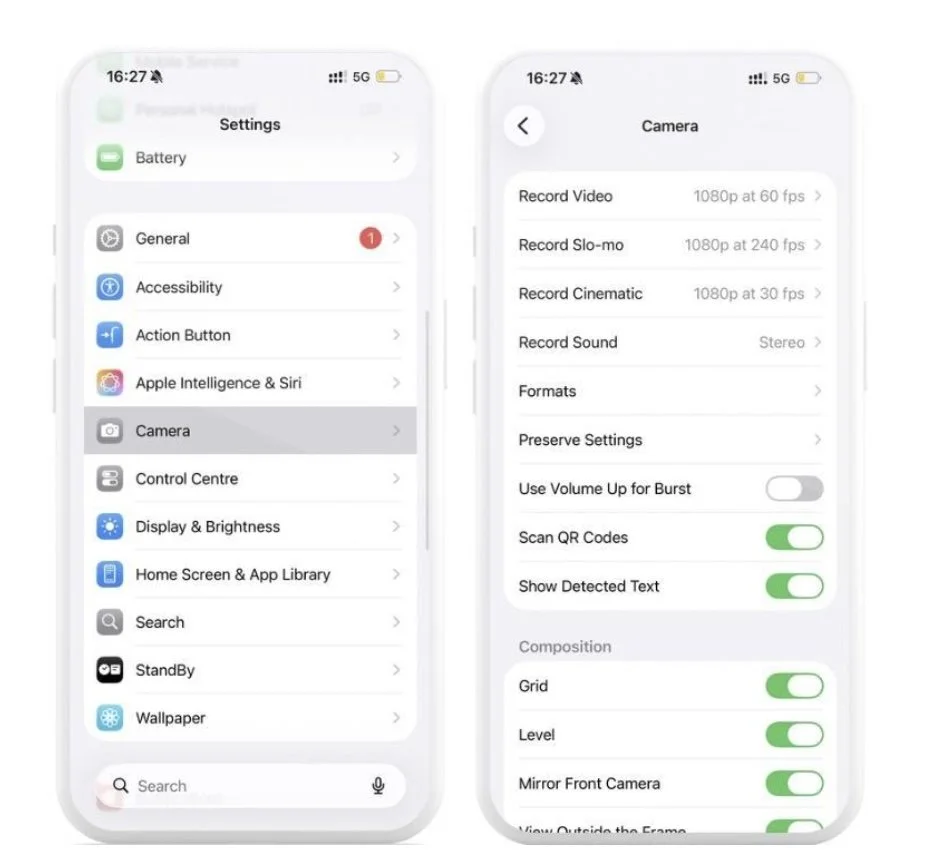
Enable Grid and Level in your iPhone camera settings to improve photo composition.
Check your format. Go to Settings, Camera, Formats: High Efficiency is a practical default for routine event photos. If you've enabled ProRAW, consider switching it off unless you plan to edit individual images heavily. Apple estimates roughly 75 MB for a 48MP ProRAW photo.
Charge your phone. Take a power bank for an all-day wedding or conference. Avoid leaving the phone in direct sun.
Make room. Go to Settings, General, and check iPhone Storage. If old screenshots, similar shots and large clips are taking up space, Clever Cleaner can help you review them. Some free cleanup tools have daily limits. Back up originals before deletion.
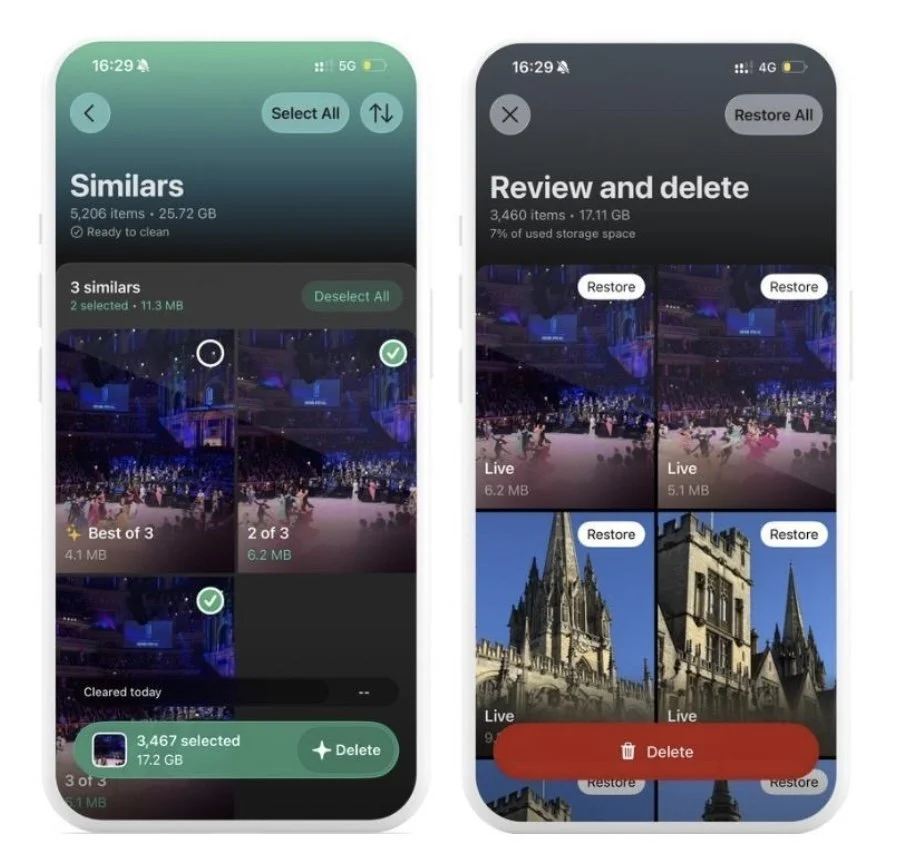
Clever Cleaner groups similar iPhone photos, making it easier to free up storage before an event.
How to Take Event Photos with an iPhone: 8 Practical Tips
The aim isn't to adjust ten settings before every photograph. Learn a few controls, then choose the technique that matches the moment. These eight methods will help you take good event photos with an iPhone without interrupting the event itself.
1. Lock Focus and Exposure Before the Moment Happens
The catch: a lock that works in one lighting setup may ruin the next shot. Reset it when you move or turn towards a window.
Your iPhone chooses focus and brightness automatically. At an event, that decision can change just as the speaker raises a glass. Tap the face you want sharp, then drag the sun icon down if bright lighting washes it out, or slightly up if it's too dark.
For a speech or posed portrait, press and hold the face until AE/AF Lock appears. Focus and exposure stop shifting when someone crosses the frame. Tap elsewhere to unlock it afterwards. Set the shot up a moment before the reaction you're hoping to capture.
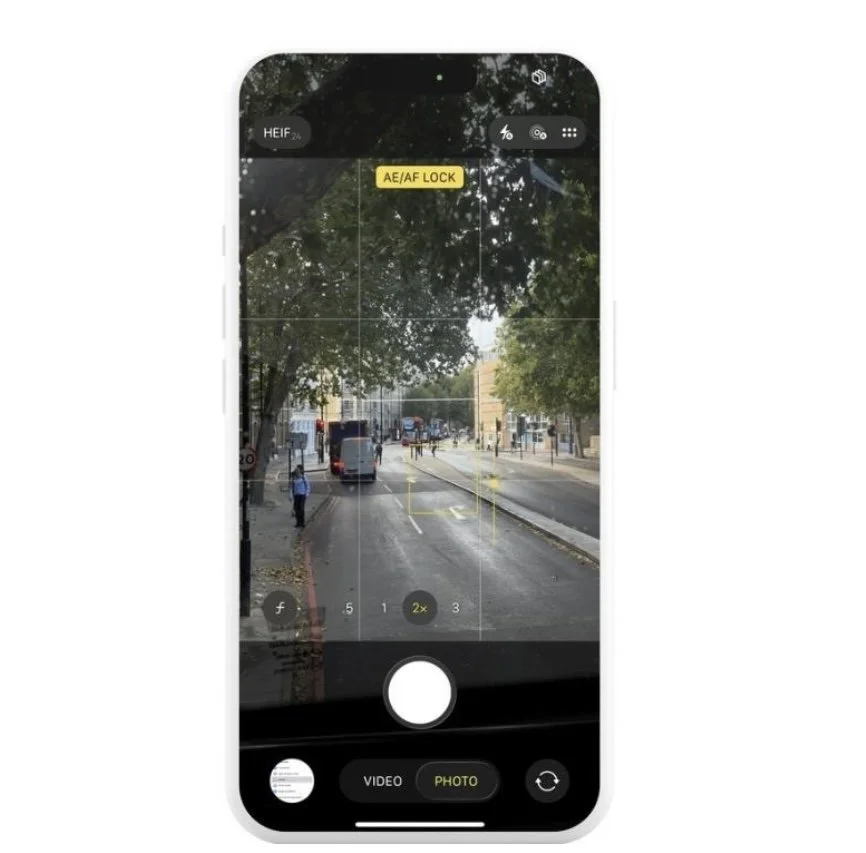
Lock focus and exposure to keep your subject sharp when the scene changes.
2. Choose the Right Lens Instead of Zooming In
The catch: the longest zoom setting is rarely the best option in a dim venue. It may rely on cropping or a camera that captures less light.
Start with the 1x main camera indoors. It usually gives you the strongest balance of light gathering and detail. The ultra-wide lens fits the whole venue into one frame, but its results can look softer in poor light.
Use optical telephoto when available and the scene is bright enough. Otherwise, take a wider shot and crop afterwards. Walking closer often works better than extreme digital zoom, provided you don't block guests or the hired photographer.
3. Find Better Light Without Relying on Flash
The catch: you can't move people during a ceremony or performance. When you cannot change their position, change yours.
Look for soft light. Near a window, ask a friend to face the daylight rather than stand directly in front of the glass. At a reception, the edge of a lit dance floor may work better for portraits than its dark centre.
Flash helps nearby subjects, not distant stages. It also gives faces a flat look and can erase the atmosphere. Instead, move towards an existing light source, then check for distracting lamps or bright signs behind the subject's head.
4. Keep Colored Lighting From Wrecking Skin Tones
The catch: one white-balance setting cannot neutralise several coloured spotlights at once. Pay attention to the light falling on the face.
Reception halls mix warm ceiling bulbs with blue, red or green LEDs. Your iPhone guesses which colour should look white, so skin can look orange in one frame and green in the next. On most models, wait for a more neutral light or change your position. Check a test shot, then correct Warmth and Tint in Photos if necessary. Strong colour casts may be impossible to remove completely.
iPhone 18 Pro and Pro Max offer manual White Balance through built-in Pro controls. Open Camera Controls, choose White Balance and adjust it while watching the subject's skin. Return to automatic when the lighting changes.
5. Use Burst Mode for Movement and Reactions
The catch: Burst captures more frames but cannot fix motion blur caused by a long exposure. Move towards better light if every frame looks smeared.
Use Burst for a bouquet toss, a dance move or a child's sudden laugh. You don't have to predict the exact split second; select the best expression from the sequence later.
On current iPhones, swipe the shutter button left and hold, then release to stop. Holding it in place generally starts QuickTake video. Alternatively, enable Use Volume Up for Burst under Settings, Camera and hold the volume-up button. Shoot short bursts around a moment rather than recording every minute this way. You'll have fewer frames to sort.
6. Change Your Angle and Watch the Background
The catch: dramatic angles can distort faces. Eye level is often better.
Instead of photographing everything while standing upright, try a lower position for an entrance, step sideways to separate guests from a messy backdrop, or capture decorations from above. Use the grid to straighten the horizon and place a subject off-centre when the background adds context.
Before shooting, scan the edges for a microphone stand cutting through a face, a bin or a stranger entering the frame. Sometimes one step fixes it. Take vertical photographs for individuals and social posts, plus horizontal ones for groups and wider scenes.
7. Take Better Group Photos Without Awkward Poses
The catch: Portrait mode may blur the wrong face when people stand at different distances. Standard Photo mode is safer for larger groups.
Arrange people in a shallow curve, keeping faces roughly the same distance from the camera. Put taller guests towards the back, check that nobody is hidden and leave some space at the frame's edges. Move to open shade outdoors if direct sunlight creates squinting and harsh shadows.
Take several frames even when everybody looks ready. One person will blink or turn away. For a small group, tap a central face to focus and check the people at either end before leaving. Don't assume one picture is enough.
8. Tell the Story With Wide, Medium, and Detail Shots
The catch: beautiful close-ups alone may not show what happened. Give key moments context.
Start with a wide shot of the venue, take a medium shot of guests talking or someone speaking, then record details such as place cards, hands applauding or a birthday cake. These tell more than twenty similar portraits.
Good event photography with an iPhone starts with a simple shot list: setting, main people, important moment, reactions and closing scene. Mix posed photos with candid ones, but respect anyone who prefers not to be photographed.
Capture a short video when sound matters, like a toast or cheering. Let photographs remain your priority rather than filming the entire event.
How to Take Great Photos at Night with an iPhone
Night mode helps with still subjects, but not necessarily moving people. On compatible iPhones, it activates automatically in low light and may capture over several seconds. Holding the phone steady reduces camera shake; it doesn't prevent dancers from blurring.
For decorations, brace your elbows or rest the phone on a stable surface. For people, seek brighter light and shorten the Night mode capture, or switch it off if faces blur. Open the Night mode controls to adjust duration; available choices vary by scene and model.
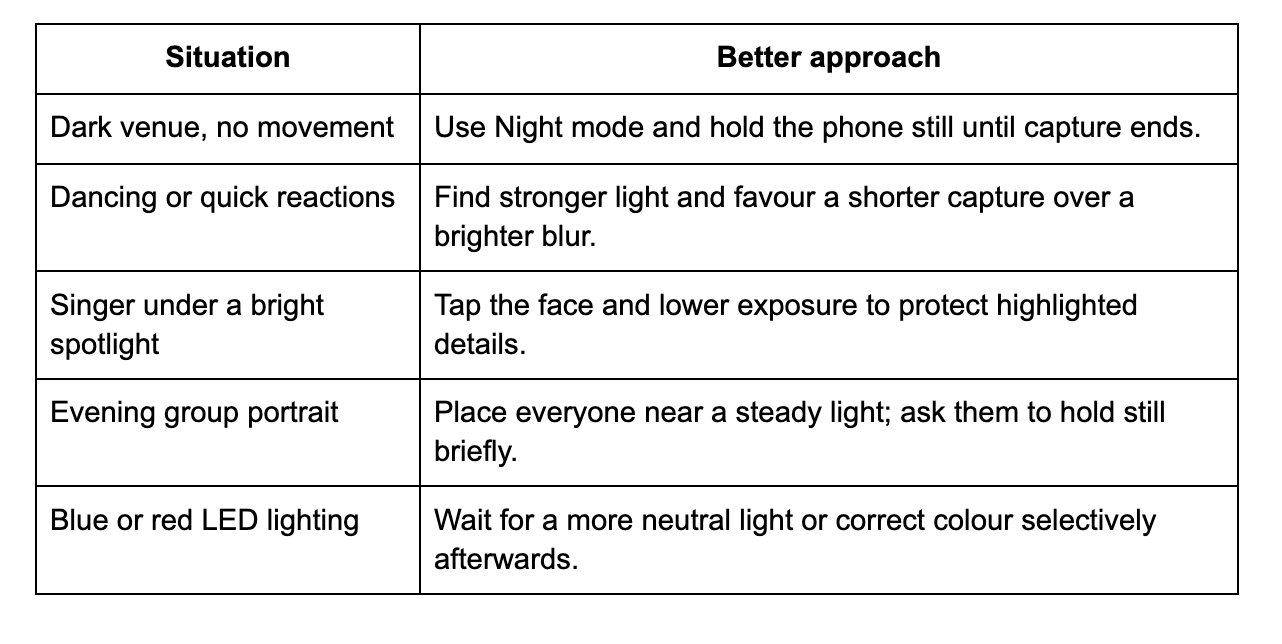
Some grain is better than a completely blurred face. To take great photos at night with an iPhone, aim for sharp expressions and controlled highlights, not artificial brightness.
Event Photography Mistakes Worth Avoiding
Avoid maximum digital zoom, flashing across a dark hall or taking every shot from one corner. Don't stand in front of a hired photographer or block another guest's view during the important part of a ceremony.
Avoid photographing people while they're eating or in an awkward situation simply because the light looks good. At private events, ask before posting recognisable pictures of guests, especially children, and respect requests not to photograph certain moments. Don't spend so long reviewing pictures that you miss the next moment. Check them when the lighting changes, then look up.
How to Sort, Edit, and Share Event Photos Afterwards
Before sharing, select the strongest frames and choose a method that preserves their quality.
Pick the Best Shots First
Make two passes. Remove obvious failures first, then choose the best expression from similar shots. Open each Burst, save your favourites and review before deleting the rest. Adjust exposure, crops and colour lightly so the gallery still looks consistent.
Remove Duplicates and Similar Photos
The Photos app includes a Duplicates collection under Collections, Utilities, where you can merge recognised duplicates. It may miss nearly identical poses. For those, this guide to apps to delete duplicates compares options. Check proposed deletions: with iCloud Photos, removing a synced image affects your other devices too.
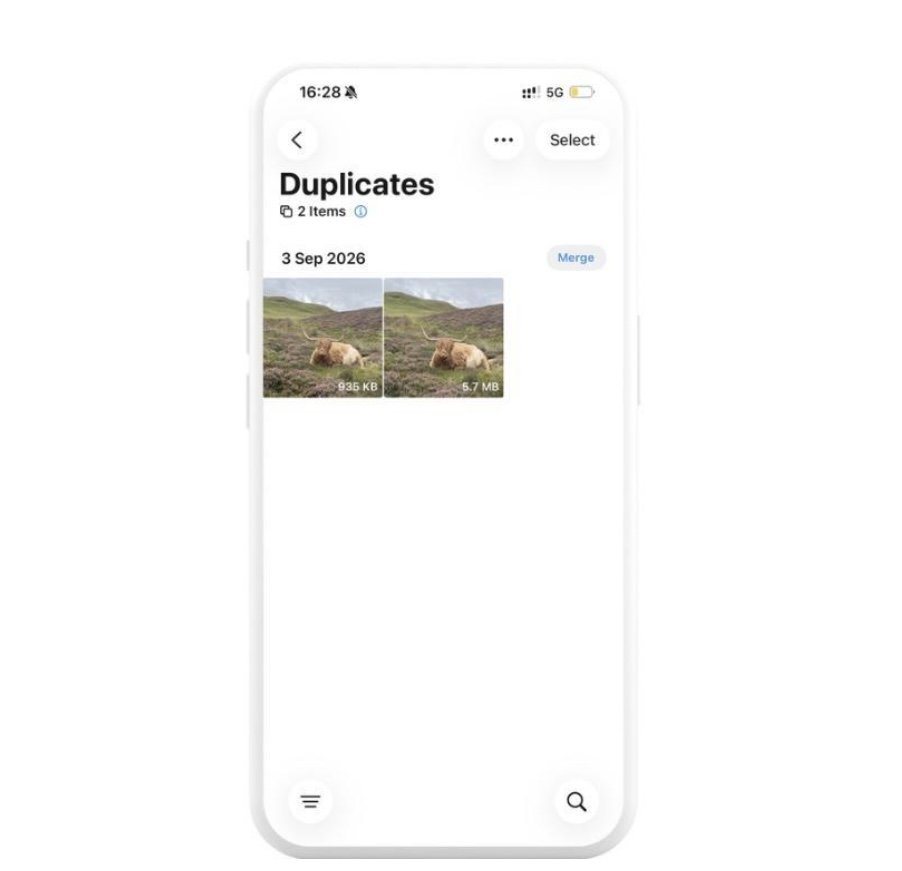
The Duplicates collection helps identify and merge duplicate photos in your iPhone library.
Share Your Photos Without Unnecessary Compression
Use AirDrop or a download link for originals. Under Share, go to Options, enable All Photos Data when sharing supported originals with metadata and edit history.
On iOS 27, new Shared Albums support full-resolution uploads. Older albums need an upgrade; only new additions then receive full resolution. Uploads count towards the owner's iCloud storage. Temporary albums don't, but expire after 30 days.
FAQ About iPhone Event Photography
What are the best iPhone camera settings for indoor events?
Use Photo mode, 1x, Grid and Level. Focus on faces, lower exposure near bright lamps and leave ProRAW off unless you'll edit heavily. No setting works in every room.
Should I use Night mode for parties and concerts?
For still subjects, yes. For dancers or fast reactions, shorten the capture or use Photo mode. A bright image isn't useful when every face is blurred.
Is Portrait mode good for group photos?
For two or three people standing together, often yes. Use standard Photo mode for larger groups to avoid misplaced background blur.
How much storage do I need for event photography?
Leave several gigabytes free for a casual event and more if filming all day. ProRAW uses far more space than ordinary HEIF photos.
Can you take professional-looking event photos with an iPhone?
Yes, particularly for candid shots and portraits in good light. Dedicated cameras still have advantages with distant subjects, very dark scenes and paid event coverage.
Conclusion
Great event photographs come from anticipating the moment, finding usable light and keeping your framing simple. Get the phone ready, learn to control exposure and shoot short bursts when something moves. At night, prioritise sharp faces over maximum brightness. Then choose a small set of strong images and share them at the quality they deserve.